| You will need the following items
1 Quaker Oats box (4" Diameter size)
1 Mounting Board (Wood)
1 100 foot spool of #24 or #22 solid
plastic
insulated
wire
Suppliers:
Ocean
State Electronics Part No. HWS24BK-100
Radio
Shack 278-1224 (also in store)
1 Germanium Diode 1n34, 1n34a, 1n60 etc.
Suppliers:
Ocean
State Electronics Part No. 1N34A
Antiques
Electronic Supplies P-Q972
Dan's
Small Parts and Kits
Computer
Controlled Automation
1 47K resistor 1/4 or 1/2 watt
Suppliers:
Ocean
State Electronics Part No. RQ47K
Antiques
Electronic Supplies R-A47K
Radio
Shack 271-1342 (also in store)
Dan's
Small Parts and Kits
1 alligator clip
Suppliers:
Ocean
State Electronics Part No. 269B
Antiques
Electronic Supplies S-H301-103
1 Ceramic Hi Impedance Earphone
Suppliers:
(Please remember: A earphone or headphones or
"ear buds" from Radio Shack
etc will not work. They must be Ceramic "HI
Impedance" earphone. NOT
the
kind used on transistor radios)
Ocean
State Electronics Part No. CE748
Antiques
Electronic Supplies P-A480
Computer
Controlled Automation
4 Fahnestock Clips (You could use a
machine
screw up
through the bottom of the board
and a nut. Then a knurled nut
or
another
nut to tighten the wires down.
Suppliers:
Ocean
State Electronics Part No. 2090
Antiques
Electronic Supplies S-H11-4034
1 365 pf
Air
Variable Capacitor
Ocean
State Electronics Part # BC14400
Antiques
Electronic Supplies Parts # C-V365
All the parts can be purchased at Ocean
State Electronics
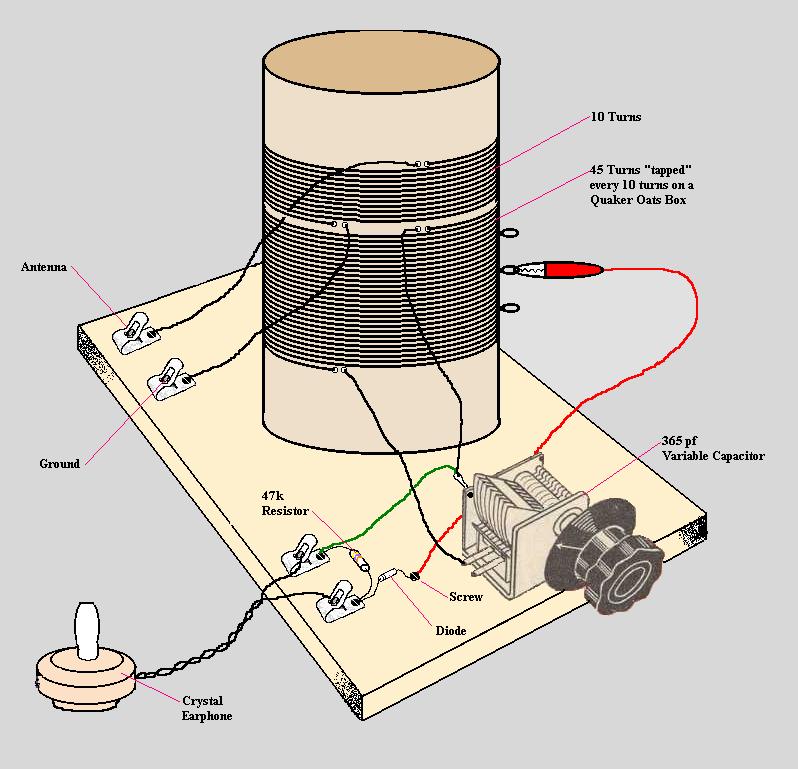
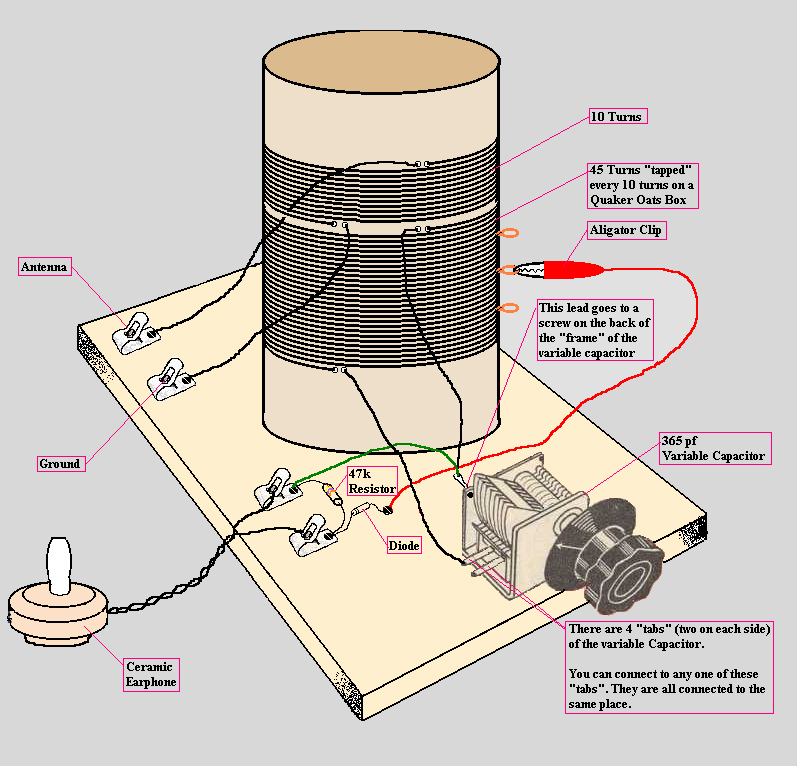
Construction
Take the Quaker Oats container (empty of coarse) and
on the
open
side, come down about a 1/2" and poke two holes (careful). Poke the
wire
through the right hole and back through the second hole like shown
below
at the top. Pull about a foot of wire out. On the inside of the oats
box,
place a piece of tape on the wire and the two holes. This will keep the
wire from slipping out.
Wrap 10 turns of wire around the oats box. Poke
two
holes next to the last turn of wire.
Cut the
wire off the spool of extra wire about a foot long. Poke the wire into
the first hole and back out the second hole. Place a piece of tape on
the
inside like on the top. This will keep the wire tight on the oats box.
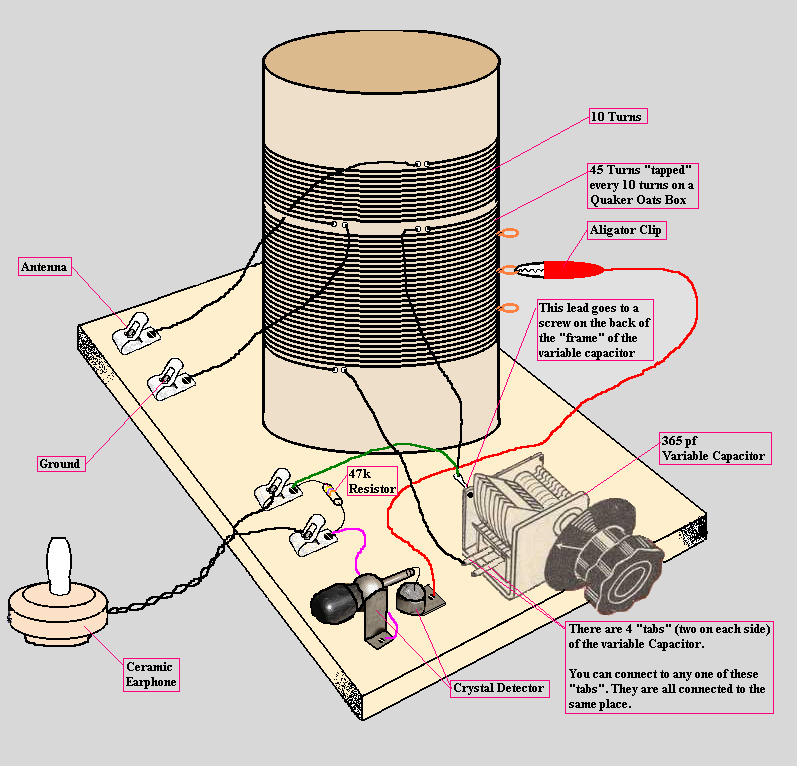
Wrap 10 turns of wire around the oats box and make a
"tap".
See the
illustration below on how to make a tap. Twist the wire a couple of
times
and remove the insulation at the twist (see below). Continue
making wraps and about every 10 turns make a tap until
you get
to 45 turns.
At 45 turns, poke two holes next to the last turn of
wire.
Cut the
wire off the spool of extra wire about a foot long. Poke the wire into
the first hole and back out the second hole. Place a piece of tape on
the
inside like on the top. This will keep the wire tight on the oats box.
You now have your coil wound like in the illustration
below
|